
The headline is right. The colours feel right. The booking details are ready. Yet the page still looks like a template, because the photographs could belong to almost any business.
You can replace images in an existing HTML page without coding. Open the file in a visual editor, select the picture, and use Replace image to upload a new file or supply an image URL. Check the new picture in the page layout, then save and preview the update.
Changing images in an HTML template is often one of the last edits before a page is ready to use. The same is true of an AI-generated landing page or a designer’s handoff: the structure may already work, while the photographs still need to reflect your product, service, or latest collection. Working directly on the existing page lets you make that decision beside the content the image needs to support.
Claywell, a fictional pottery workshop page, illustrates two useful approaches. Its hero needs a stronger sense of the making process; its material section needs a clearer view of an individual object. We’ll replace a black-and-white still life with a workbench photograph, then replace a group of tableware with a single bowl illustration.
Replace images in the HTML page you already have
Start by opening the file through HtmlDrag’s online HTML file editor. Upload HTML loads the existing page into a visual workspace. The Claywell file includes its original images, font, and styles, giving us the complete course page to work with.
 Figure 1. The existing Claywell HTML file being prepared for the editing workspace.
Before choosing a replacement, look at how the page uses its pictures. Claywell’s hero combines a still life, a yellow course panel, and a hand-building close-up. Updating the left photograph can give the opening a different emphasis while keeping the price, headline, and supporting image in view. That makes it easier to judge a small change without losing sight of the page as a whole.
 Figure 2. The imported page, with the original hero composition visible in context.
Choose replacement images for what visitors need to see
A course page and a ceramics shop may use similar photographs, but their visitors are asking different questions. Finished objects show what pottery can look like. A workbench with clay and tools helps someone imagine taking part. For a beginner workshop, the opening image should make the activity feel approachable.
Further down the page, readers are ready for a closer look. Beside “There’s no perfect shape,” a single bowl can show an uneven rim and textured glaze more clearly than a group of cups and plates. The two images serve different moments in the reader’s decision.
Match the replacement to the role of the image
| Image role Useful starting point What should remain clear? | ||
| Hero or experience image | A scene with an obvious activity and room around the subject. | The activity at a glance, alongside the headline and main action. |
| Product or material detail | One well-lit subject, with space around its important edges. | Shape, finish, and the feature discussed in the nearby text. |
| Supporting image | A complementary angle, texture, or close-up. | A useful second detail rather than a repeat of the main photograph. |
When choosing files, consider the image’s shape, the space around the subject, and how much detail will remain visible at its displayed size. A wide photograph can lose its most important detail in a narrow crop; a portrait image with generous background can work well in a wider frame.
A short image brief can help when you are choosing from a library or asking someone to prepare assets:
For this beginner pottery page, choose a workbench scene for the hero and one clear bowl image for the material section. Leave space around the hands and bowl rim for desktop and mobile crops. Keep the approved page layout and course details; use imagery that accurately represents the offer.
The original images below establish the two starting points: a still life in the hero and a tableware collection in the material section.
 Figure 3. Before: a black-and-white still life occupies the left side of the hero composition.
 Figure 4. Before: the material section uses a group of tableware beside its message about individual shapes.
Replace the hero photo in its existing layout
For the hero, the new workbench photograph adds tools, clay, and the surroundings of a pottery session. The hand-building close-up on the right supplies the tactile detail. Together, they give the visitor both a setting and a closer view of the activity.
In HtmlDrag, right-click the photograph you want to change and choose Replace image. In a tightly arranged section like this one, check that the target is the individual photograph before applying the new asset.
 Figure 5. The replacement command is available on the selected hero photograph.
The replacement window offers Upload from device for a file on your computer and Use online image for a hosted image URL. Here, we used the prepared workbench photograph from a local file.
 Figure 6. The image input options, with local upload selected for the workbench photograph.
Once the picture is applied, review what it does to the opening. A more detailed image adds visual interest, but the course price and main action still need to be easy to find. The surrounding content gives you a better basis for that judgment than an image-library thumbnail.
 Figure 7. The workbench photograph in the hero, alongside the course panel and hand-building image.
In this composition, the textured workbench contrasts with the simple yellow course panel. The subject remains recognisable in the displayed crop. For your own hero, look for that balance: enough information to establish the scene, with a clear route from the headline to the next action.
 Figure 8. After: the workbench scene in a close view comparable to Figure 3.
Update detail images with a clear focal point
A detail image needs to make one feature easy to inspect. For ceramics, that might be the rim, glaze, or surface texture; for another product, it could be a fastening, finish, or label. Decide which feature matters before choosing how tightly to frame it.
Claywell’s second replacement uses a prepared AI-created bowl illustration. Its pale glaze and irregular outline suit the material section’s discussion of individual shapes.
 Figure 9. The second replacement targets the material photograph further down the page.
The replacement uses the same tool as the hero update. The source file is a portrait image, while the desktop frame is wider. Space around the bowl gives that wider crop room to work without cutting into the rim.
 Figure 10. The single bowl illustration replaces the group of tableware.
The close view shows the whole bowl clearly beside the explanation. This is a useful test for product and material images: can a visitor see the feature the text promises to explain? If an important edge disappears, try a looser source composition or prepare a different crop before changing the surrounding layout.
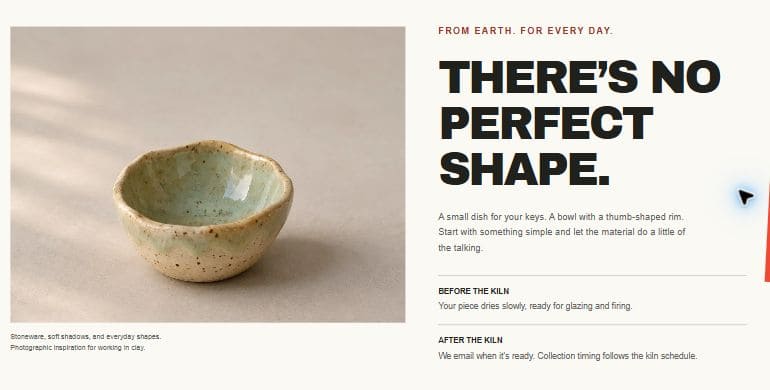 Figure 11. After: the rim, glaze, and bowl outline remain visible in the material section.
Why a replacement image can look cropped or blurry
An image has its own proportions; the page gives it a display area. If those shapes differ, the page may crop the image to fill the available space. For example, CSS object-fit: cover preserves proportions while clipping edges that fall outside the frame.
That explains why a complete picture in your photo library can look incomplete on a website. Check the subject’s edges in the actual page, and choose a crop that keeps the important details visible. Stretching the picture to force everything into view can distort the object you are trying to show.
Desktop preview is also a chance to judge the first impression at normal reading size. Can someone understand the activity without studying the photo? Does the image support the headline, and is the next action easy to spot?
 Figure 12. The updated opening section in desktop preview.
Further down, the material image needs enough room for the bowl’s shape and surface to be readable alongside the text. Reviewing each picture where it appears catches issues that a full-page overview can hide.
 Figure 13. The material section’s final desktop preview.
If a replacement looks soft rather than cropped, check the source quality. A small thumbnail enlarged to fill a wide area may lack detail. Use a suitable original and a web-ready export, then compare it at the size visitors will see. Reducing its visible size on the page does not by itself reduce the image file’s download size.
Save the image refresh and review the mobile layout
Once the two pictures work in context, save a version of the page. For a handoff to your website’s publishing workflow, the export window’s Edited HTML view offers options to download or copy the updated HTML.
 Figure 14. The export options for the edited HTML page.
The Claywell replacements were saved in the project, leaving the updated material section available for future edits. Keeping a saved version is useful when the next change involves new dates, another product, or a different seasonal image.
 Figure 15. The updated material section in the workspace after saving.
A mobile view deserves a separate look. The image area may become narrower, a supporting picture may disappear, and the course information may move. Check that the main subject still makes sense in the space it has. Claywell’s mobile-size view shows the workbench image beside the yellow course panel in a narrower composition.
 Figure 16. The updated hero in the editor’s mobile-size viewport.
A picture update can also reveal a small gap in the copy. You might insert a short caption explaining the material, or link a product image to its detail page. If readers need to compare workshop options, HtmlDrag’s table tools let you insert a table and edit its cells, rows, and columns alongside the visual content.
While adjusting nearby elements, you can lock completed pieces to reduce accidental movement, or delete a retired promotion. These small edits help the new imagery fit the current offer.
Before using the updated page, check:
- The intended pictures have changed, and their main subjects remain clear.
- Desktop and mobile views show the details visitors need.
- The files look sharp at their displayed size and have been prepared for web use.
- Captions, image descriptions, and photo credits match the new assets.
- Linked images lead to the intended destination.
- The saved page and the HTML used for publishing contain the update.
Image descriptions should follow the new subject too. Google’s image guidance recommends useful alt text in the context of the page. A specific description of the subject is more helpful than repeating a string of search keywords.
Common questions about replacing images in HTML
Can I change images in an AI-generated HTML page?
Yes, if you have an HTML file that opens correctly in the editor. Check that the styles and assets load, select the existing picture, and apply the replacement. A prepared image can be used directly without a new generation request.
Should I upload a file or use an online image URL?
Upload when you have the approved file on your computer. Use an online image URL when the asset is hosted at a stable, accessible address. The address should lead to the image itself, rather than a gallery page or a sign-in screen.
Can I use a portrait image in a wide image area?
Sometimes. The bowl example works because there is enough background around the subject for a wider crop. A tightly framed portrait may lose important details, so check it in the actual image area and again at mobile size.
Does replacing a picture update its caption or link?
The picture, caption, credit, and click destination need separate attention. After changing the image, review the surrounding content and any link so they still describe and lead to the right thing.
What size should a replacement website image be?
Choose enough resolution for the intended display area, while keeping the file practical for web use. A hero photo usually needs more detail than a small card image. Check the displayed result and the current upload limit instead of relying on one size for every position.
Will saving the image update publish it to my live website?
Saving keeps the edited page in the HtmlDrag project. To update a separately hosted website, use the edited HTML in that website’s publishing workflow.
A good image refresh makes the offer more specific. A workbench helps a visitor imagine the activity; a single object makes its details easier to understand. If your HTML template still uses placeholder or outdated pictures, open it in the visual HTML editor and replace them where they already belong in the page.